In the summer of 1940 the fate of Britain, and arguably of occupied Europe, rested on a few hundred young men and two types of single-seat fighter. The Battle of Britain was the first great battle in history decided entirely in the air, and the Battle of Britain aircraft that fought it have become some of the most recognisable machines ever built. The Hawker Hurricane and Supermarine Spitfire defended the skies over southern England against a Luftwaffe that had swept aside every air force it had met, spearheaded by the formidable Messerschmitt Bf 109.
Yet the battle was never simply Spitfire against Messerschmitt. It was won as much by an invisible system of radar stations, telephone lines, plotting tables and sector controllers as by the fighters themselves, and it was fought by pilots from 15 nations, Britain included. This guide looks at the aircraft on both sides, the system that directed them, the course of the fighting from the Channel convoys in July to the exhausted final skirmishes of October, and why the outcome changed the course of the Second World War.
What this guide covers
- Britain alone: the summer of 1940
- The opposing air forces
- The fighters: Hurricane, Spitfire and Bf 109
- The German bombers and heavy fighters
- The Dowding system: radar, plotters and sector stations
- The battle phase by phase
- Battle of Britain Day: 15 September 1940
- The Few from many nations
- Why the RAF won
- Counting the cost
- Key aircraft compared: specifications
- Why the battle mattered
- Photographing Battle of Britain aircraft today
- Frequently asked questions
Britain alone: the summer of 1940
By the end of June 1940 the strategic position looked hopeless. France had surrendered on 22 June, barely six weeks after the German offensive in the west began. The British Expeditionary Force had escaped from Dunkirk without its heavy equipment. Poland, Denmark, Norway, the Netherlands, Belgium and Luxembourg had all fallen. Germany controlled the entire coastline of western Europe from the Arctic Circle to the Spanish border, and its air force could now operate from bases in the Pas de Calais that put London within easy reach of even short-ranged fighters.
Hitler expected Britain to negotiate. When it became clear that the government under Winston Churchill would fight on, German planning turned to invasion. Operation Sea Lion, the plan to land troops on the south coast of England, was issued in July 1940, and it came with an unavoidable precondition. The Royal Navy vastly outgunned the German Kriegsmarine, which had been badly mauled in the Norwegian campaign, so the only way an invasion fleet of converted river barges could cross the Channel was under an umbrella of complete German air superiority. The Luftwaffe had to destroy RAF Fighter Command first. Reichsmarschall Hermann Goering assured Hitler that his airmen could do it in a matter of weeks.
What followed, between 10 July and 31 October 1940 by the official British reckoning, was a battle unlike any fought before. There were no front lines and no armies engaged. The battlefield was the air over the Channel, the fields of Kent and Sussex, the ports of the south coast and eventually the streets of London. Churchill had already given it a name in a speech to the Commons on 18 June: the Battle of France was over, and the Battle of Britain was about to begin.
The opposing air forces
On paper the odds favoured the Luftwaffe heavily. Against Britain it deployed three air fleets, Luftflotte 2 in the Low Countries and northern France, Luftflotte 3 in western France and Luftflotte 5 in Norway and Denmark, with a combined strength usually put at around 2,600 serviceable aircraft, including roughly a thousand medium bombers and around a thousand fighters. Its crews were confident and experienced, blooded in Spain, Poland, Norway and France. No air force in the world had a comparable record.
RAF Fighter Command, led by Air Chief Marshal Sir Hugh Dowding from Bentley Priory in north London, began July with something in the region of 640 serviceable single-seat fighters, a figure that rose as the battle went on. The command was organised into four groups. No. 11 Group under Air Vice-Marshal Keith Park covered London and the south east and would bear the overwhelming weight of the fighting. No. 10 Group covered the south west, No. 12 Group under Air Vice-Marshal Trafford Leigh-Mallory the Midlands and East Anglia, and No. 13 Group the north and Scotland.
The imbalance in numbers was real, but it concealed several British advantages that would prove decisive. Fighter Command was fighting over its own territory, so a British pilot who baled out could be back with his squadron the same day, while a German pilot in the same position went into captivity. British aircraft factories, driven hard by Lord Beaverbrook’s new Ministry of Aircraft Production, were out-producing Germany in single-seat fighters by a wide margin through the summer. And Britain possessed something no other country in the world had in 1940: a fully integrated air defence system that could see raids coming and concentrate fighters against them.
The fighters: Hurricane, Spitfire and Bf 109
Hawker Hurricane: the workhorse
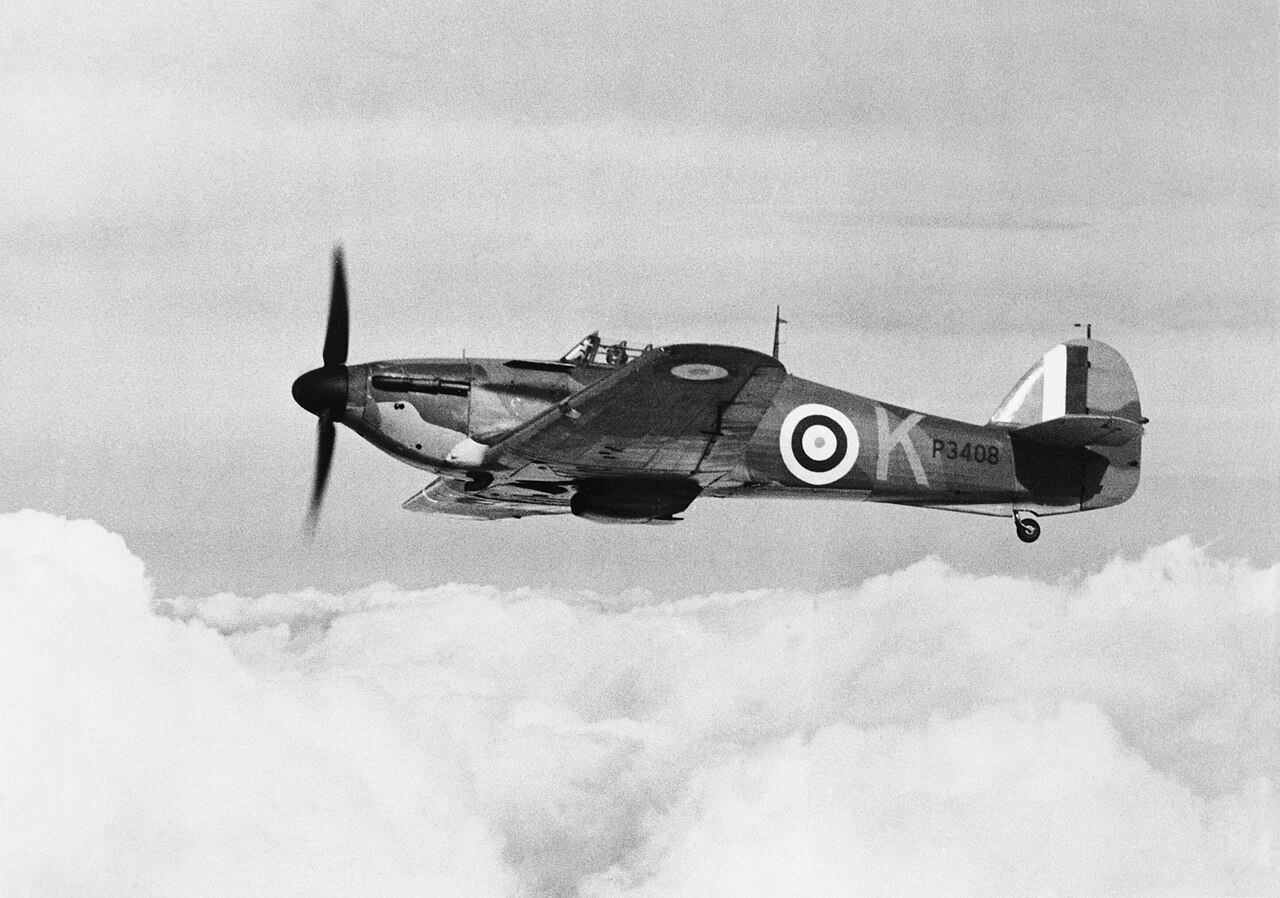
The Hawker Hurricane was the RAF’s first monoplane fighter and the backbone of Fighter Command in 1940. Sydney Camm’s design, first flown in November 1935, was in many ways a bridge between eras. Its structure of metal tube covered with fabric over the rear fuselage descended directly from Hawker’s biplane fighters, mated to a Rolls-Royce Merlin engine, a retractable undercarriage and an armament of eight .303 inch Browning machine guns in the wings.
That older technology brought real advantages. The Hurricane was simple to build, and Hawker and its subcontractors could turn them out in numbers that Supermarine could not match with the more complex Spitfire. It was easy to repair, and battle damage that would have written off a stressed-skin fighter could be patched at squadron level with fabric and dope. Its wide-track undercarriage forgave rough grass airfields and hurried landings by tired pilots. It was a steady, stable gun platform, and its eight guns were grouped close together in the wings, giving a concentrated pattern of fire that was particularly effective against bombers.
The price was performance. With a top speed of around 325 mph the Hurricane Mk I was some 30 mph slower than both the Spitfire and the Bf 109E, and above 20,000 feet it struggled. Fighter Command’s answer, applied whenever the tactical situation allowed, was to direct Hurricanes against the German bomber formations while Spitfires took on the escorting fighters. The division was never rigid, and plenty of Hurricane pilots fought 109s on even terms, but it played to each type’s strengths. The often-quoted Fighter Command analysis credited the Hurricane with around six out of every ten German aircraft destroyed in the battle, more than every other defence, Spitfires, anti-aircraft guns and the rest, put together. There were simply more of them: roughly three Hurricane squadrons for every two of Spitfires. We have covered the type’s full story in our Hawker Hurricane history.
Supermarine Spitfire: the thoroughbred
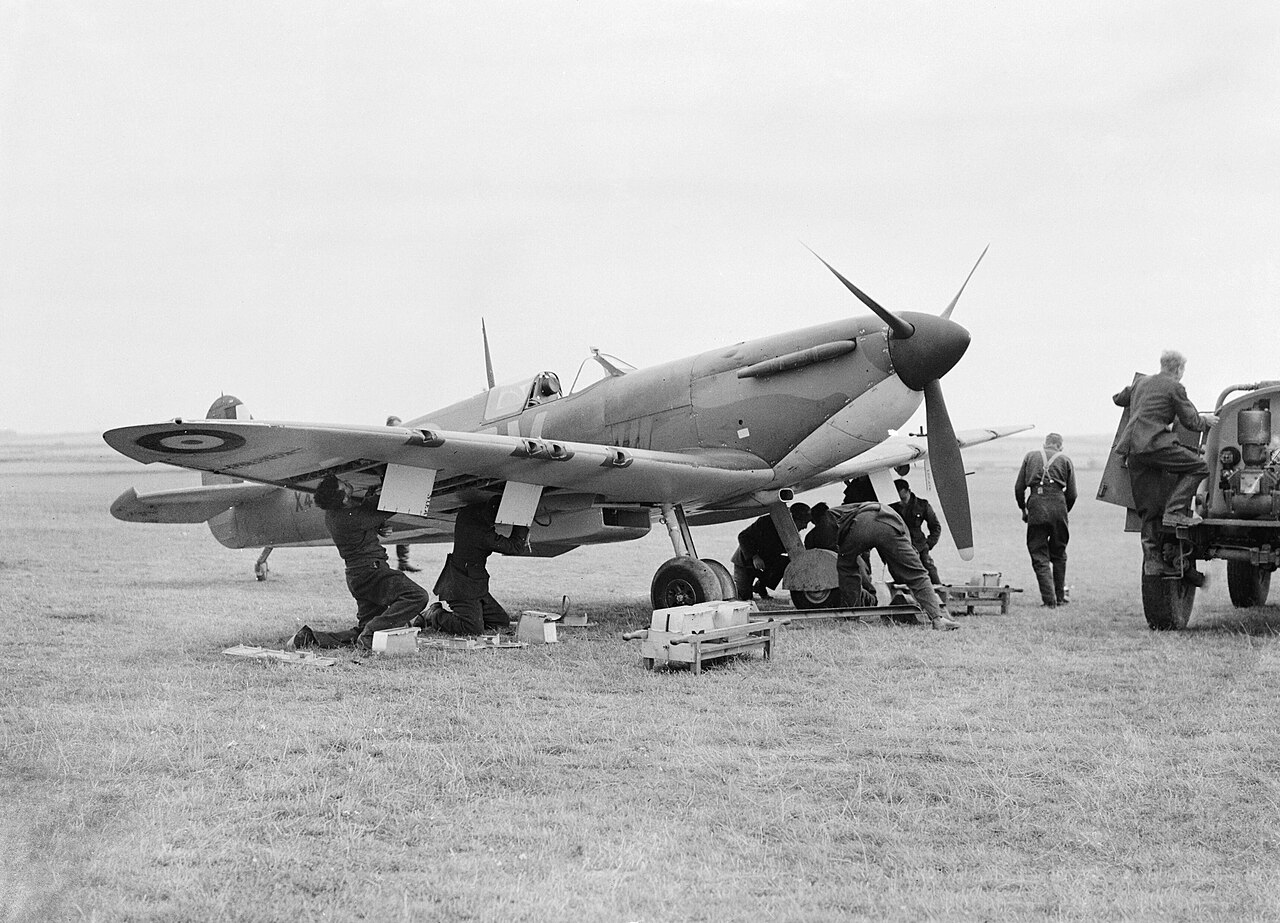
If the Hurricane did the heavy lifting, the Supermarine Spitfire captured the imagination, and it has never let go of it since. R. J. Mitchell’s fighter, first flown in March 1936 and refined from a line of Schneider Trophy racing seaplanes, was aerodynamically a generation ahead of the Hurricane. Its thin elliptical wing and flush-riveted stressed-skin construction gave the Spitfire Mk I a top speed of around 355 mph and a rate of climb and high-altitude performance the Hurricane could not approach.
Against the Bf 109E the Spitfire was remarkably evenly matched. The Messerschmitt climbed faster and could dive away under negative g, where the Spitfire’s carburetted Merlin cut out momentarily. The Spitfire turned appreciably tighter, was faster at some altitudes and slower at others, and carried eight rifle-calibre machine guns against the German fighter’s mix of cannon and machine guns. Which aircraft held the advantage usually came down to height, sun, fuel state and above all the pilot. German aircrew paid the Spitfire the compliment of blaming it for everything: RAF pilots noted wryly that captured German airmen almost always claimed to have been shot down by a Spitfire, never a Hurricane.
Production was the Spitfire’s weak point in 1940. The huge new shadow factory at Castle Bromwich was slow to get into its stride, and until late in the battle Supermarine’s works around Southampton carried much of the load, surviving heavy bombing in September that killed dozens of workers and forced production to disperse into garages and workshops across the south. The type’s longer story, from prototype K5054 to the last photo-reconnaissance marks, is told in our Supermarine Spitfire history.
Messerschmitt Bf 109: the hunter on a leash
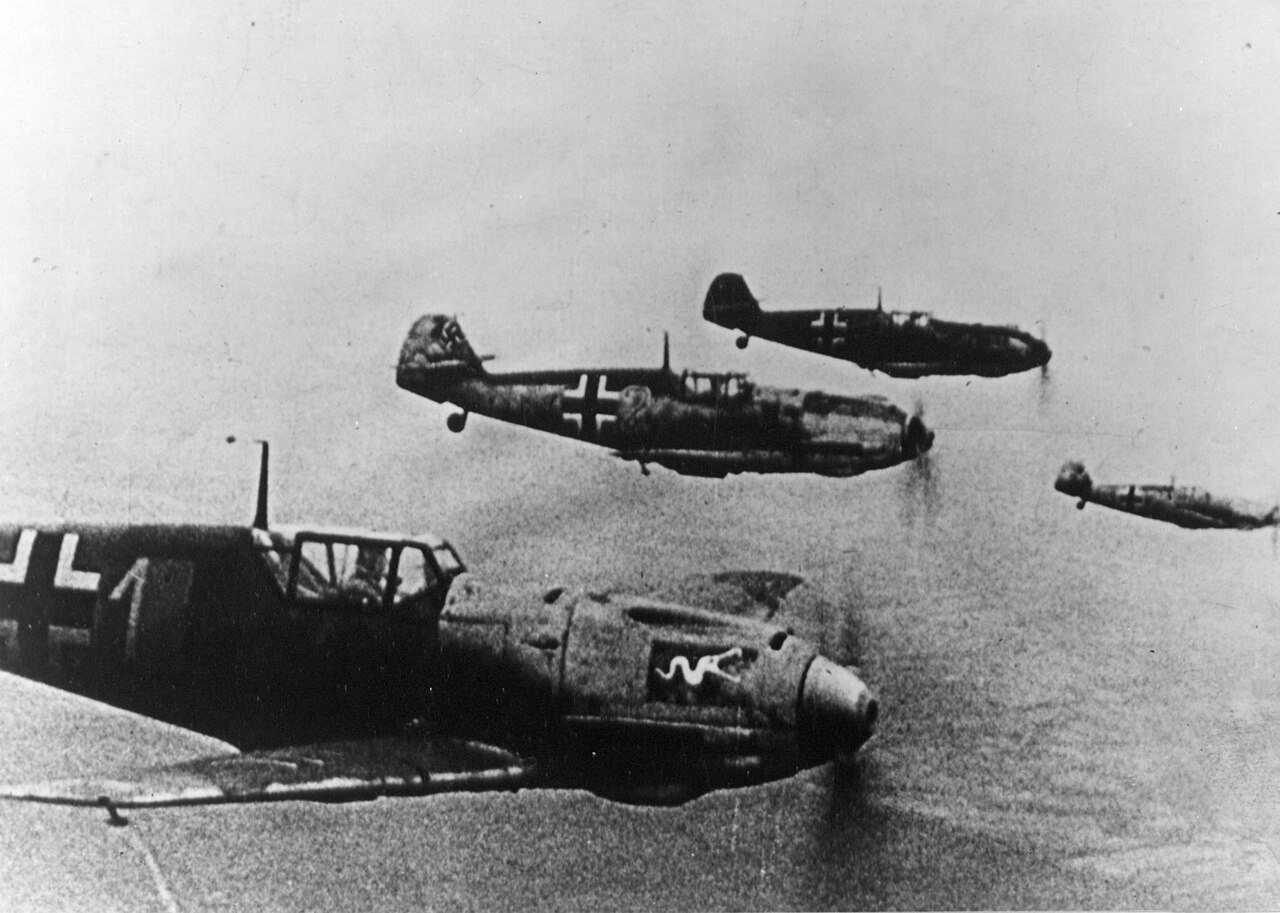
The Messerschmitt Bf 109E was the only German aircraft of the battle that RAF fighter pilots regarded as a really dangerous opponent. Willy Messerschmitt’s small, angular fighter was powered by a Daimler-Benz DB 601 engine with direct fuel injection, which kept running under negative g and let 109 pilots escape by bunting into a dive, a manoeuvre no Merlin-engined fighter could follow cleanly in 1940. Most E variants carried two 20 mm cannon and two 7.92 mm machine guns, and a single hit from an explosive cannon shell could do damage that dozens of rifle-calibre rounds would not.
Its fatal weakness was fuel. Operating from the Pas de Calais, a 109 had only around 20 minutes of combat time over southern England, and over London itself often ten minutes or less before the red fuel warning light forced it home across the Channel. Many were lost simply to ditching or forced landings with dry tanks. When Goering ordered his fighters to abandon their favoured free hunting sweeps and chain themselves to close escort of the bombers, flying at the bombers’ speed and altitude, the 109 lost much of its edge, and its pilots knew it. The type’s development and combat record are covered in our Messerschmitt Bf 109 history.
The unlucky ones: Defiant and Blenheim
Fighter Command also went into the battle with two types that had no business in a daylight fighter engagement by 1940. The Boulton Paul Defiant, a two-seater with all its armament in a powered turret and no forward-firing guns, had a brief moment of success before German pilots learned its layout. On 19 July 1940 No. 141 Squadron lost six of nine Defiants in a single engagement with Bf 109s off Dover, and No. 264 Squadron suffered heavily in August. The type was withdrawn to night fighting, where it did useful work. The Bristol Blenheim, pressed into service as a long-range day fighter and night fighter, was similarly outclassed, though Blenheim bomber crews flew dangerous raids against the invasion ports throughout the battle.
The German bombers and heavy fighters
The Luftwaffe of 1940 was built as a tactical air force, designed to support a fast-moving army, and its bomber fleet reflected that. All three of its main bombers were twin-engined medium types carrying loads of roughly a ton to two tons, a fraction of what the four-engined heavies of later years would lift. Against dispersed, well-organised targets like airfields and radar stations, and against a defended city the size of London, it was never enough to be decisive.
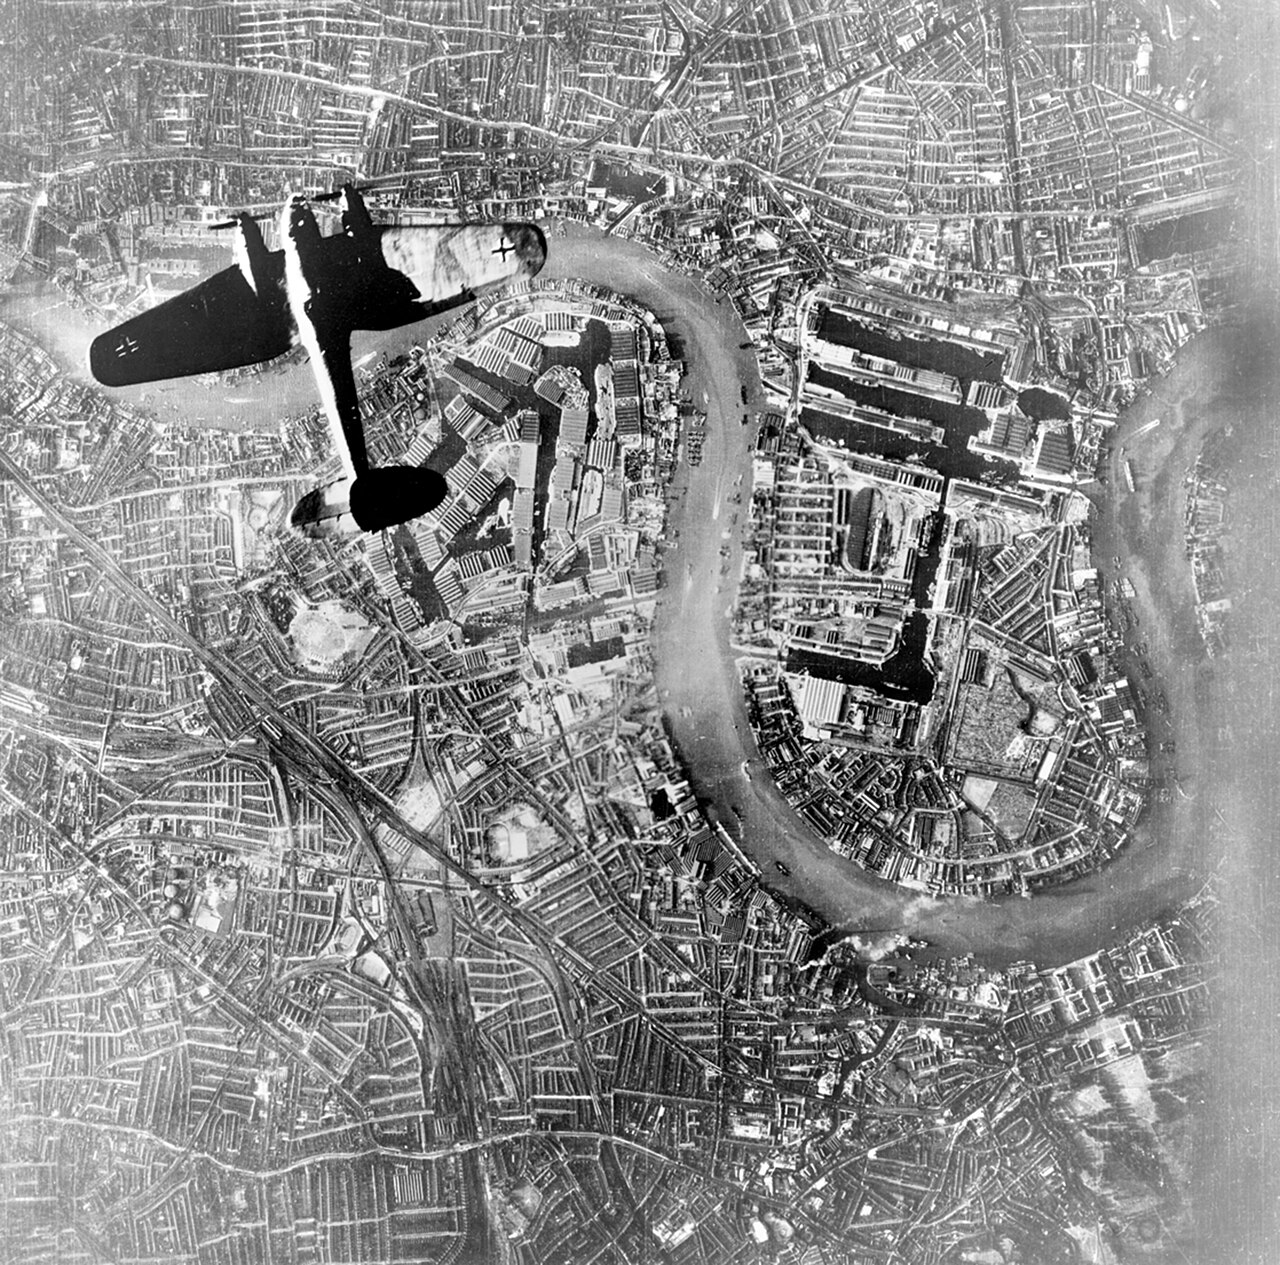
The Heinkel He 111 was the most numerous, a converted fast airliner design with a distinctive glazed nose, sturdy and capable of absorbing punishment but slow and, by the summer of 1940, thoroughly vulnerable. The Dornier Do 17, the slim “flying pencil”, was agile at low level but carried the smallest load of the three. The Junkers Ju 88 was the newest and best, nearly as fast as a Hurricane at some heights and able to dive-bomb, though early marks had teething troubles and its crews suffered heavily all the same.
Two more types completed the German order of battle, and both were found wanting. The Junkers Ju 87 Stuka dive bomber had terrorised Poland and France, but its accuracy came at the cost of speed and defensive armament. Over England, attacking targets defended by radar-directed modern fighters, it was a death trap. After a series of massacres in mid-August, including catastrophic losses on 18 August, the Stuka wings were largely withdrawn from the battle. The Messerschmitt Bf 110, a big twin-engined “destroyer” that Goering had expected to be his elite long-range escort, proved unable to survive against single-seat fighters. By late August, in one of the battle’s stranger ironies, Bf 110 escort formations were themselves being escorted by Bf 109s.
The Dowding system: radar, plotters and sector stations
The most important British weapon of the battle was one the public never saw. In the late 1930s, while the aircraft were being designed, Dowding had overseen the construction of the world’s first integrated air defence network, a system so far ahead of anything else in existence that historians now simply call it the Dowding system.
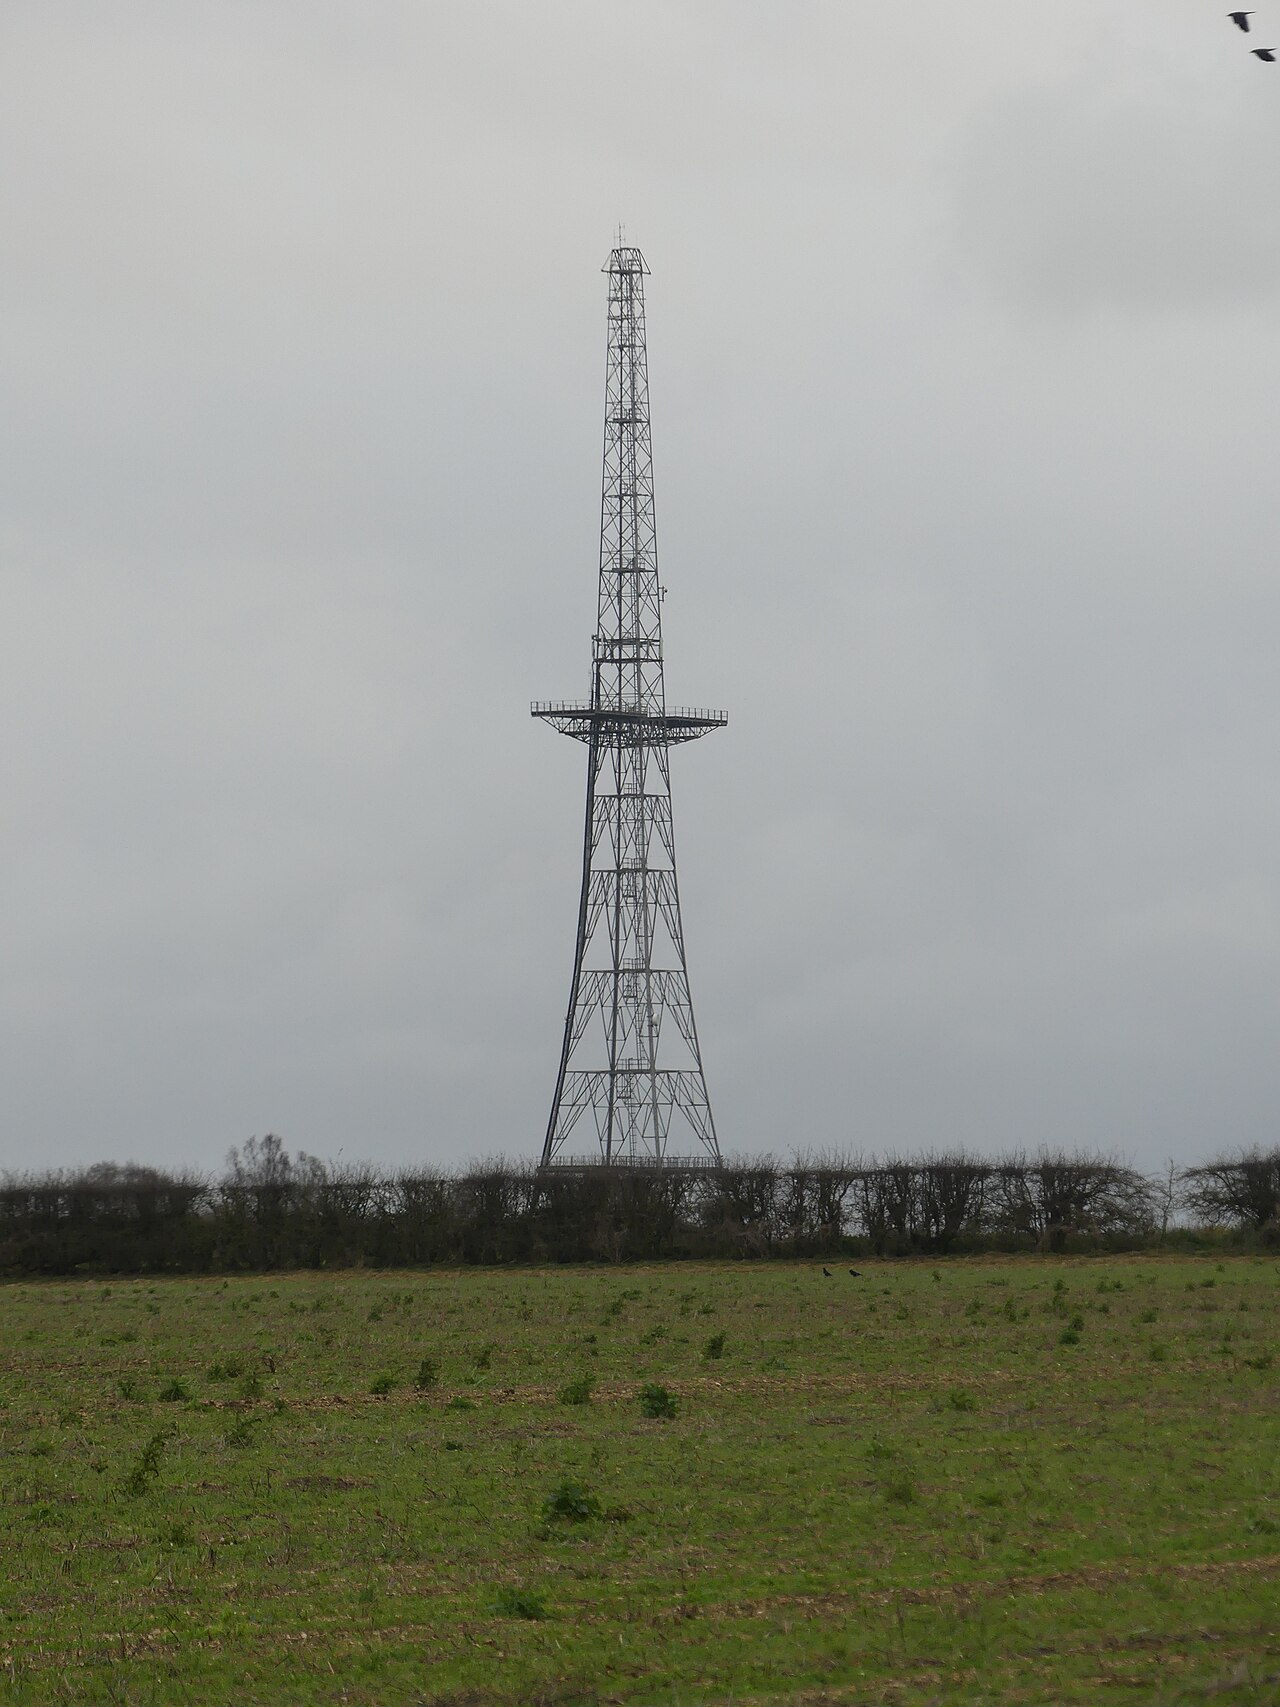
Its eyes were the radar stations. The Chain Home stations, with their tall steel transmitter towers strung along the coast from the north of Scotland to the west country, could detect aircraft forming up over France while they were still climbing to altitude. They were crude by later standards, looking only out to sea and giving approximate heights, but they were reliable and their operators were skilled at reading raid strength from the flickering trace. A second network, Chain Home Low, caught aircraft coming in under the main beams. Once raiders crossed the coast, tracking passed to the Observer Corps, thousands of volunteers on posts across the country reporting height, course and numbers by telephone.
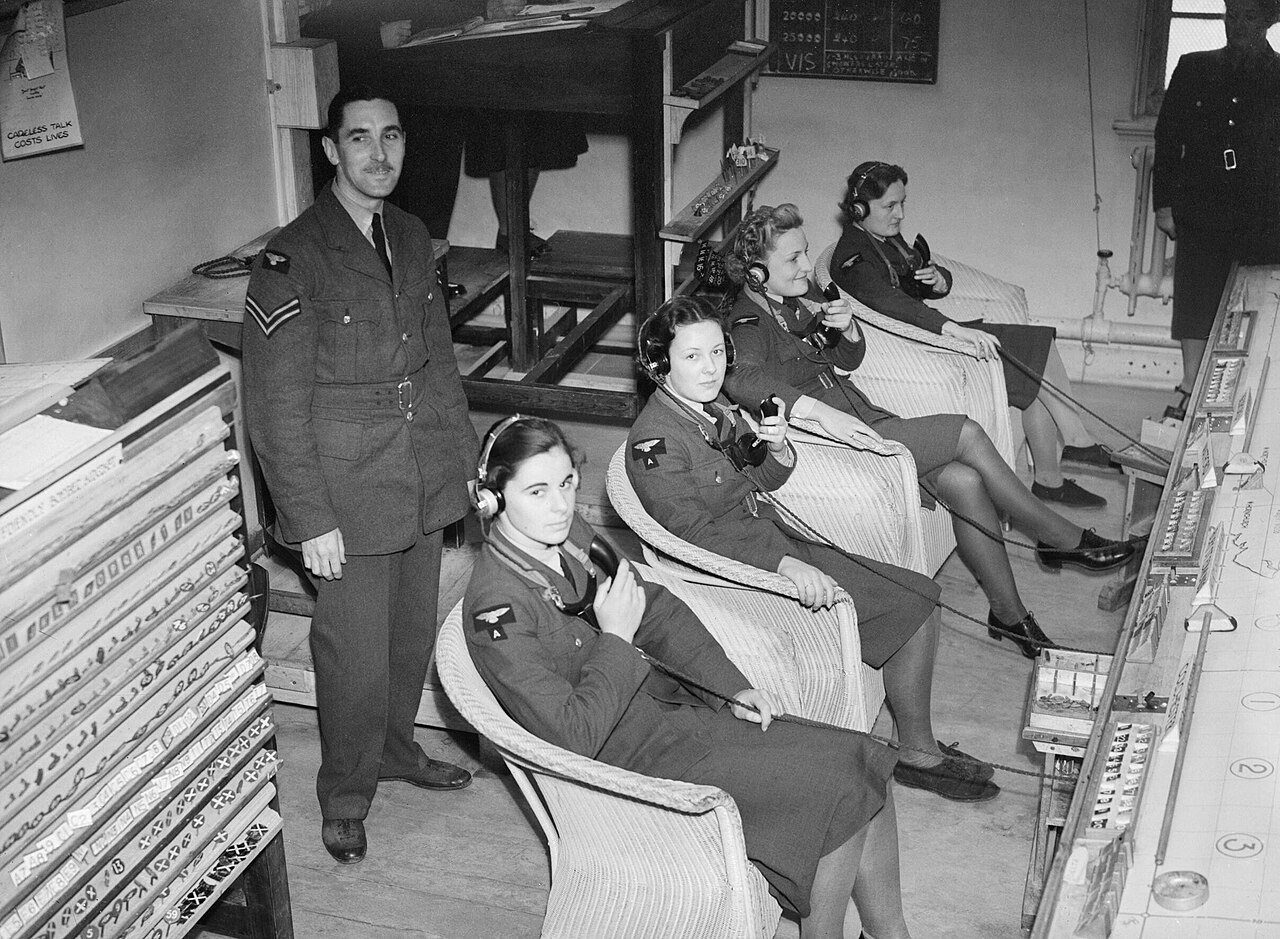
All of this information flowed by landline to the Filter Room at Bentley Priory, where duplicate and conflicting reports were resolved into a single recognised air picture. That picture was passed simultaneously to Fighter Command, to the group headquarters and down to the sector stations, the key fighter airfields such as Biggin Hill, Kenley, Hornchurch, Tangmere, North Weald and Duxford, each with its own operations room. Around the plotting tables, WAAF plotters pushed counters representing raids and squadrons with croupiers’ rakes, while a controller on the dais above ordered squadrons to readiness, scrambled them and vectored them by radio onto incoming raids.
The effect was to multiply Fighter Command’s strength several times over. Without radar, defending fighters must fly standing patrols, wearing out engines and pilots for hours to be in the right place once. With the Dowding system, squadrons sat at dispersal until a raid was actually plotted, then climbed to meet it. Every German raid could be opposed; no British sortie was wasted. The Luftwaffe never understood the system it was fighting, and its failure to persist in attacking the radar stations and sector operations rooms was among its greatest mistakes of the battle.
The battle phase by phase
The Channel battles: July to early August
The opening phase, which the Germans called the Kanalkampf, was aimed at coastal convoys and Channel ports. Its purpose was partly practical, closing the Channel to British shipping, and partly to draw Fighter Command into a battle of attrition over water. Dowding and Park refused to take the bait in strength, committing squadrons sparingly. The fighting was vicious enough all the same, and it exposed the Defiant’s fatal weakness and taught both sides lessons about tactics. Convoys eventually stopped running through the Strait of Dover by day.
Eagle Attack: mid-August
The main assault on Fighter Command itself opened in the second week of August. Adlertag, Eagle Day, came on 13 August, with the Luftwaffe flying nearly 1,500 sorties against airfields, ports and aircraft factories. Two days later, on 15 August, the Luftwaffe made its maximum effort of the entire battle, attacking with all three air fleets at once. Luftflotte 5, striking the north east of England from Norway in the belief that Fighter Command had stripped its northern groups, was mauled by No. 13 Group squadrons and never returned in daylight strength. By the day’s end the Luftwaffe had lost around 75 aircraft, and its crews had learned that there was no soft flank anywhere over Britain.
On 18 August, remembered as the Hardest Day, both sides together suffered some of their heaviest losses of the whole battle as the Luftwaffe hammered the sector stations at Kenley and Biggin Hill and the Stukas were cut to pieces over the south coast. Yet the attacks on the radar chain, which had briefly blinded parts of the system earlier in the month, were not pressed home. Goering, misreading their value, ordered effort shifted elsewhere.
The crisis: late August to early September
The two weeks from 24 August to 6 September brought Fighter Command closer to real trouble than any other period. The Luftwaffe concentrated on No. 11 Group’s sector airfields and their operations rooms, and the arithmetic began to turn. Biggin Hill was wrecked repeatedly, its operations room reduced to running from a village shop. Pilot losses outran the training organisation’s ability to replace them, and squadrons rotated in from the quieter groups were sometimes shot to pieces within days. Park’s fighters were still exacting a price the Luftwaffe could not afford indefinitely, and Fighter Command was never as close to collapse as post-war legend sometimes claims, but the strain on the men and the system was immense and could not have been borne for ever.
The turn on London: 7 September
Then the pressure lifted. Late on 7 September, following RAF Bomber Command raids on Berlin at the end of August and a deliberate German decision to force a climactic battle, the Luftwaffe switched its main effort from the airfields to London. That afternoon nearly a thousand German aircraft came up the Thames, and the docks of the East End burned through the night. For Londoners it was the start of the Blitz and of terrible suffering. For Fighter Command it was reprieve. The sector stations were left to recover, and the German bombers now had to fly further, under fighter escort operating at the very limit of its fuel, into the heart of the defended zone.
Exhaustion: October
After the failure of the great daylight assaults of mid-September, the Luftwaffe shifted by stages to night bombing of the cities and to high-altitude fighter-bomber nuisance raids by day. The October fighting, high, cold and often dismissed in summary accounts, still cost both sides steadily. By 31 October, the official British end date, the daylight battle had guttered out. The night Blitz on Britain’s cities would continue until May 1941, but the invasion threat was gone: Hitler had postponed Sea Lion indefinitely on 17 September, and in practice it was never revived.
Battle of Britain Day: 15 September 1940
If one day symbolises the whole battle it is Sunday 15 September, commemorated ever since as Battle of Britain Day. The Luftwaffe mounted two massive daylight raids on London, intended as the decisive blow that would finally break Fighter Command. Instead, the German formations were met at every stage of their approach. Park’s 11 Group squadrons attacked in pairs from Kent, 10 Group covered the western flank, and over London itself the Duxford Big Wing of five squadrons from 12 Group arrived en masse, a shock to German crews who had been assured the RAF was down to its last few dozen fighters.
Watching the plotting table at 11 Group’s underground operations room at Uxbridge, Churchill asked Park what reserves he had. The answer has passed into history: there were none. Every squadron was committed. But it was enough. Bomber formations were broken up and scattered their loads, and stragglers were harried all the way back to the coast. British claims that evening of 185 German aircraft destroyed were wildly inflated, as claims on both sides always were in the confusion of mass air fighting; the true German loss was around 60 aircraft, against fewer than 30 RAF fighters. What mattered was not the exact score but the demonstration. Two months into an offensive that was supposed to have destroyed it, Fighter Command was meeting the Luftwaffe’s best effort in greater strength than ever. Two days later Hitler shelved the invasion.
The Few from many nations
Churchill fixed the airmen’s place in history on 20 August 1940, telling the Commons that never in the field of human conflict was so much owed by so many to so few. The Few were the 2,937 aircrew who qualified for the Battle of Britain clasp by flying at least one operational sortie with an eligible unit between 10 July and 31 October 1940. Most were British, but nearly 600 came from elsewhere: Poland, New Zealand, Canada, Czechoslovakia, Australia, Belgium, South Africa, France, Ireland, the United States and more. Airmen of 14 nations beyond the United Kingdom flew in the battle.
The Polish contribution was the largest and most celebrated. Some 145 Polish pilots flew in the battle, most of them experienced airmen who had already fought the Luftwaffe over Poland and France, and No. 303 (Polish) Squadron, flying Hurricanes from Northolt, became the most successful Fighter Command squadron of the battle by claims, credited with 126 victories in six weeks despite joining the fight only at the end of August. Alongside them flew 88 Czechoslovaks, among them Sergeant Josef Frantisek of 303 Squadron, whose 17 credited victories placed him among the very highest scorers of the entire battle. Dowding himself later wrote that had it not been for the Polish squadrons’ magnificent work and gallantry, he could not say the outcome of the battle would have been the same.
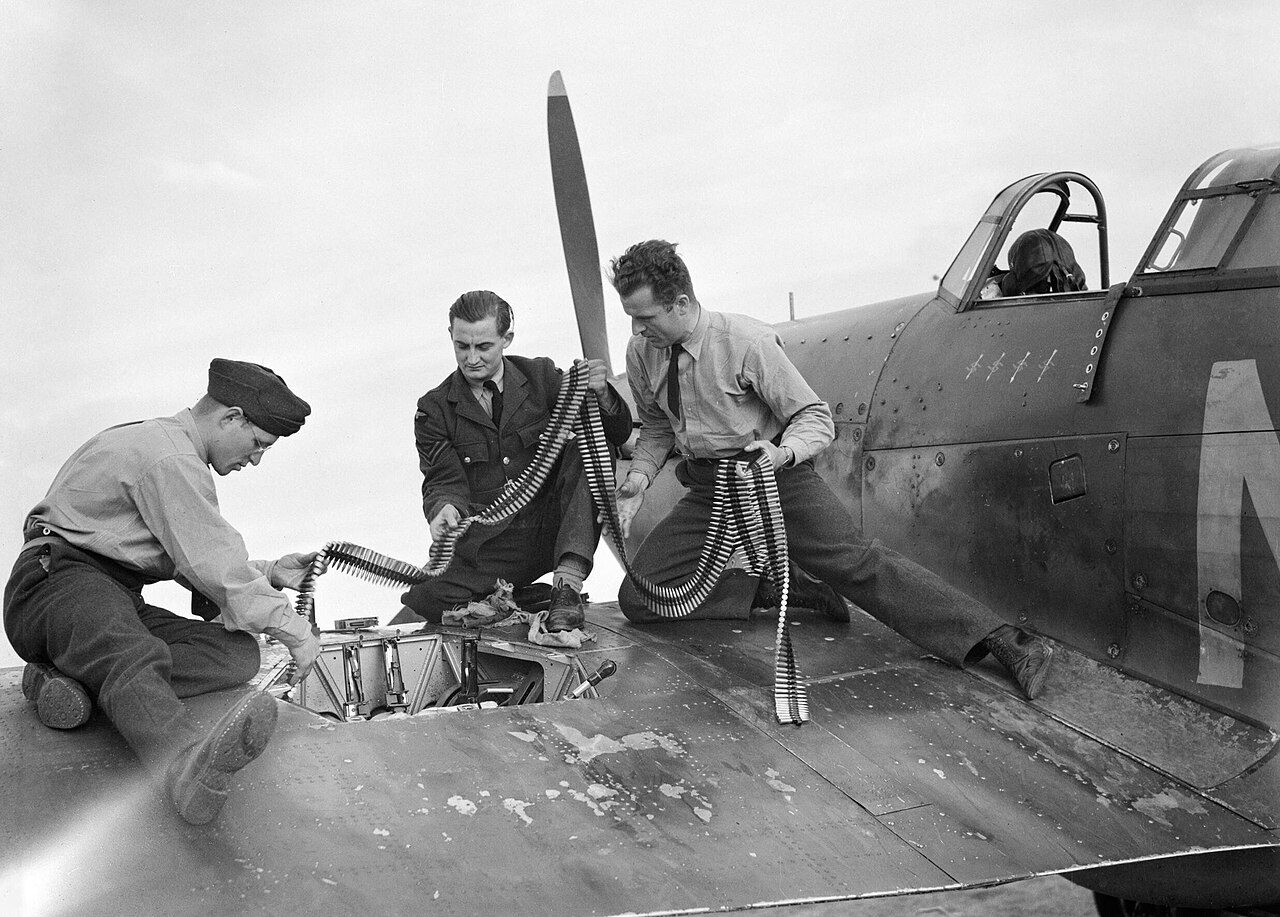
The cost fell on them all. Of the 2,937, 544 were killed during the battle itself, and nearly 800 more of the Few died before the war ended. Behind the fighter pilots stood the ground crews who kept the aircraft flying from bombed airfields, the WAAF plotters and radar operators who stayed at their posts under attack, and the crews of Bomber and Coastal Command, more than 700 and nearly 300 of whom respectively were killed in the same period attacking invasion barges and German airfields. Their part in the battle is often forgotten.
Why the RAF won
The Luftwaffe’s defeat had many fathers. The Dowding system meant Fighter Command almost always met raids in an organised way, husbanding its strength instead of exhausting it on patrols. Fighting over home ground returned shot-down pilots to the battle while German aircrew losses were permanent, and every German bomber lost took a whole trained crew with it. British factories delivered fighters faster than they were destroyed for the campaign as a whole, while German fighter production lagged well behind British through the crucial months.
German errors compounded the imbalance. Intelligence on Fighter Command was consistently and sometimes absurdly wrong, repeatedly declaring it beaten. Target priorities shifted, from ports to airfields to London, before any single line of attack was pressed to a conclusion, and the radar chain was never systematically destroyed. The Bf 109’s short legs were squandered by chaining it to close escort. The Ju 87 and Bf 110, cornerstones of the pre-war force, proved unusable and nearly useless respectively in contested daylight skies. Above all, the Luftwaffe had been built for short tactical campaigns, and it was asked to win a strategic air war of attrition alone, something no air force of 1940 could have done.
Credit belongs equally to the leadership of the defence. Dowding had built the system, fought to keep his fighters home during the fall of France, and refused to be drawn into wasteful mass battles. Park handled 11 Group with a precision and daily judgement that even his opponents came to admire. Their reward, after an autumn of internal politics over the Big Wing controversy, was to be quietly removed from their posts before 1940 was out, a shabby episode that history has largely corrected.
Counting the cost
Exact loss figures for the battle vary between sources depending on dates and counting rules, and wartime claims on both sides were heavily inflated, so round figures are the honest ones. The RAF lost around 1,500 aircraft from all commands between 10 July and 31 October, just over a thousand of them Fighter Command machines, with 544 Fighter Command aircrew killed and around a thousand more dead from Bomber and Coastal Commands. The Luftwaffe lost around 1,900 aircraft and well over 2,500 aircrew killed, with hundreds more taken prisoner. Civilian deaths from the bombing, overwhelmingly in the London Blitz that began during the battle, ran into the tens of thousands by mid-1941.
Set against the war’s later slaughters the numbers can look small. Set against the stakes, they do not. Had Fighter Command been destroyed in September 1940, no one can say with certainty what would have followed, invasion, a negotiated peace or a long siege, but every path from that point ran through a Britain unable to defend its own sky, and none of them led anywhere good.
Key aircraft compared: specifications
Figures below are representative of the main variants flying in the summer of 1940. Contemporary test figures vary with load, altitude and source, so treat small differences with caution.
| Aircraft | Role | Crew | Top speed (approx) | Armament |
|---|---|---|---|---|
| Hawker Hurricane Mk I | Fighter | 1 | 325 mph | 8 x .303 in machine guns |
| Supermarine Spitfire Mk I | Fighter | 1 | 355 mph | 8 x .303 in machine guns |
| Messerschmitt Bf 109E | Fighter | 1 | 348 mph | 2 x 20 mm cannon, 2 x 7.92 mm machine guns |
| Messerschmitt Bf 110C | Heavy fighter | 2 | 336 mph | 2 x 20 mm cannon, 5 x 7.92 mm machine guns |
| Heinkel He 111 | Medium bomber | 5 | 255 mph | Defensive machine guns, c. 2,000 kg bombs |
| Dornier Do 17Z | Medium bomber | 4 | 255 mph | Defensive machine guns, c. 1,000 kg bombs |
| Junkers Ju 88A | Medium bomber | 4 | 280 mph | Defensive machine guns, c. 2,000 kg bombs |
| Junkers Ju 87B | Dive bomber | 2 | 238 mph | 3 x 7.92 mm machine guns, c. 500 kg bombs |
Why the battle mattered
The Battle of Britain was the first defeat of Nazi Germany’s armed forces, at a moment when no other outcome anywhere in the world was checking them. Its consequences ran far beyond the autumn of 1940. Britain survived as a base from which the bomber offensive, the Atlantic campaign and ultimately the liberation of western Europe in 1944 were mounted. American opinion, watching through the reports of correspondents such as Edward R. Murrow, saw that Germany could be resisted, which underpinned the aid that followed. When Hitler turned east against the Soviet Union in June 1941, he did so with an undefeated enemy at his back, condemning Germany to the two-front war its planners had always dreaded.
The battle also settled, for the rest of the century, how air defence would be done. Radar-directed, centrally controlled interception of the Dowding pattern became the model for every serious air defence network from 1940 to the present day, and the lesson that command and control matters as much as aircraft performance has never been unlearned. And it left a cultural mark out of all proportion to its size: the Few, the sound of a Merlin, the shape of an elliptical wing over an English summer sky remain among the most powerful shared images in British memory.
Photographing Battle of Britain aircraft today
The aircraft of 1940 are still flying, and photographing them is one of the great pleasures of aviation photography in Britain. The RAF Battle of Britain Memorial Flight operates Spitfires and Hurricanes through the display season, and IWM Duxford, itself a Battle of Britain sector station, hosts air shows where Spitfires and Hurricanes still fly from the grass they flew from in 1940, sometimes in numbers not seen since. Airworthy Bf 109s are rarer, though Hispano Buchon versions, Spanish-built 109 airframes with Merlin engines, appear regularly on the European display circuit.
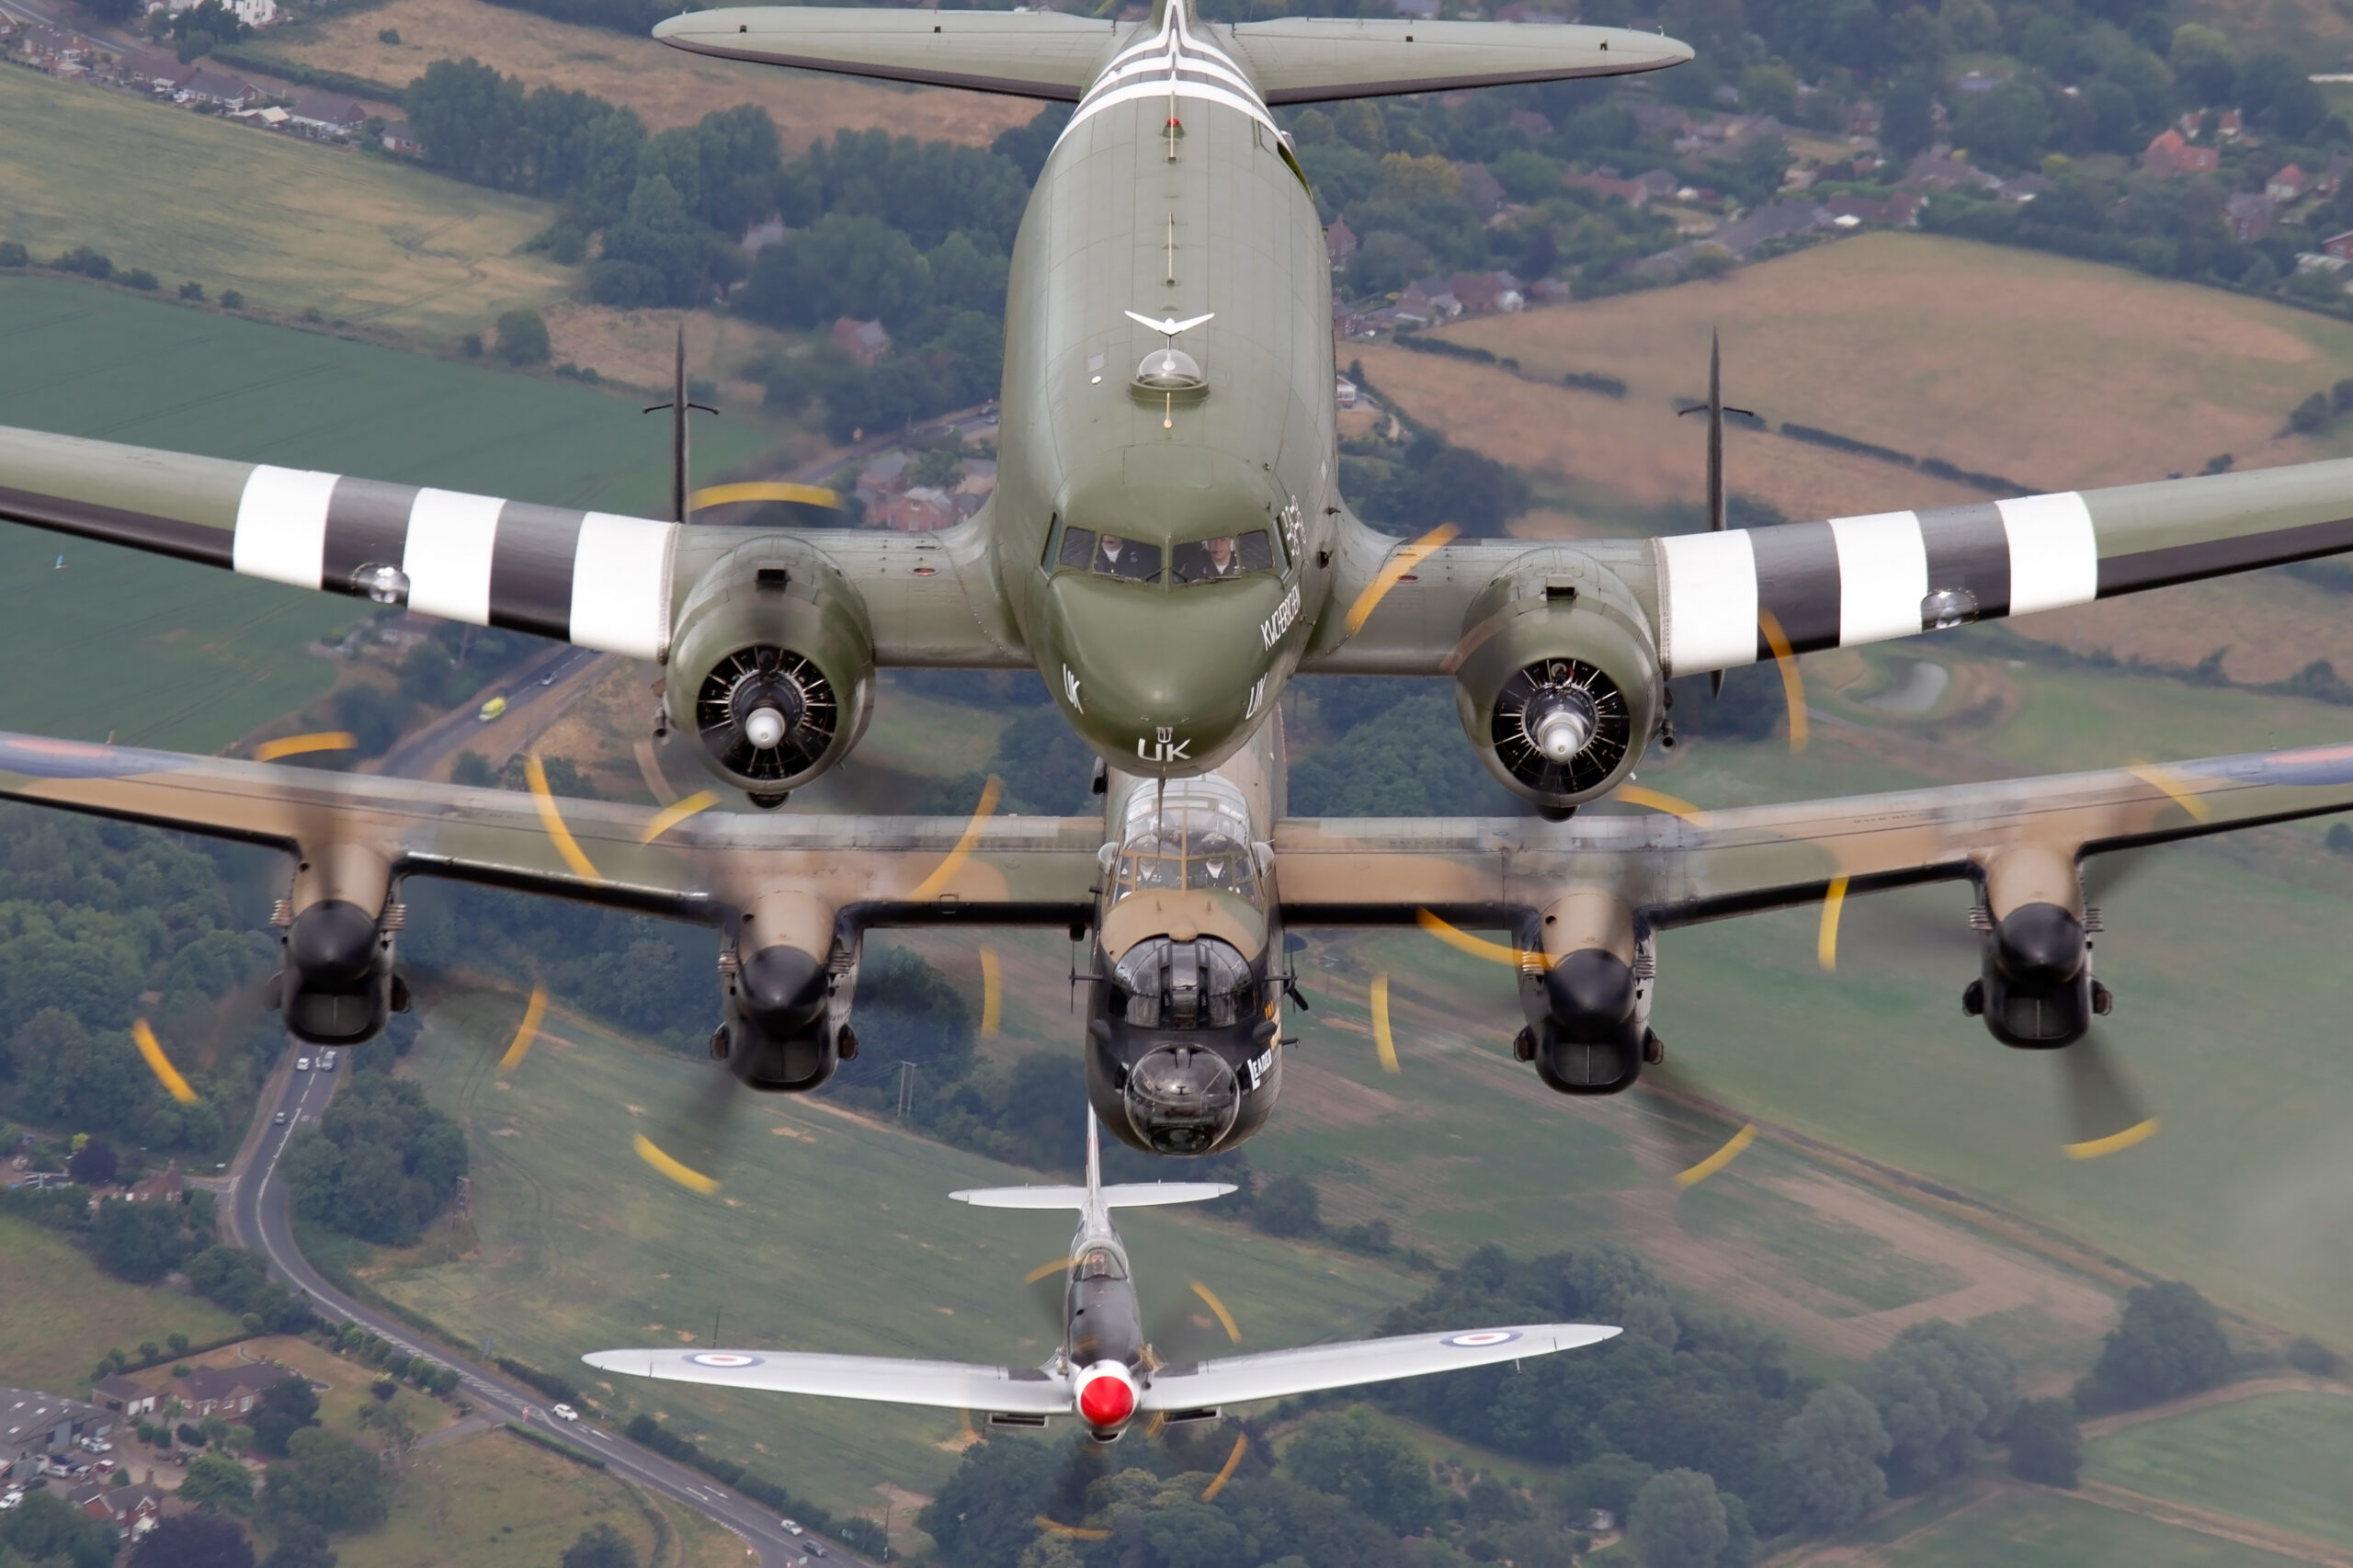
The photographic essentials are the same as for any piston warbird: keep the shutter speed down, somewhere in the 1/250 to 1/320 second region, so the propeller shows a full arc of blur rather than freezing unnaturally, and be ready for the low, fast topside passes that display pilots love. Our guide to photographing warbirds covers technique, settings and positioning in detail. On the ground, museum survivors at the RAF Museum, IWM Duxford and the Science Museum offer genuine 1940 combat veterans, and the National Memorial to the Few at Capel-le-Ferne, on the cliffs the battle was fought above, is a moving place to photograph at first and last light.
The Piemags archive holds a substantial collection of Spitfire, Hurricane and other warbird images from decades of air show and museum photography, browsable in the archive galleries. All images are available for editorial and commercial use; licensing details are on our licensing page.
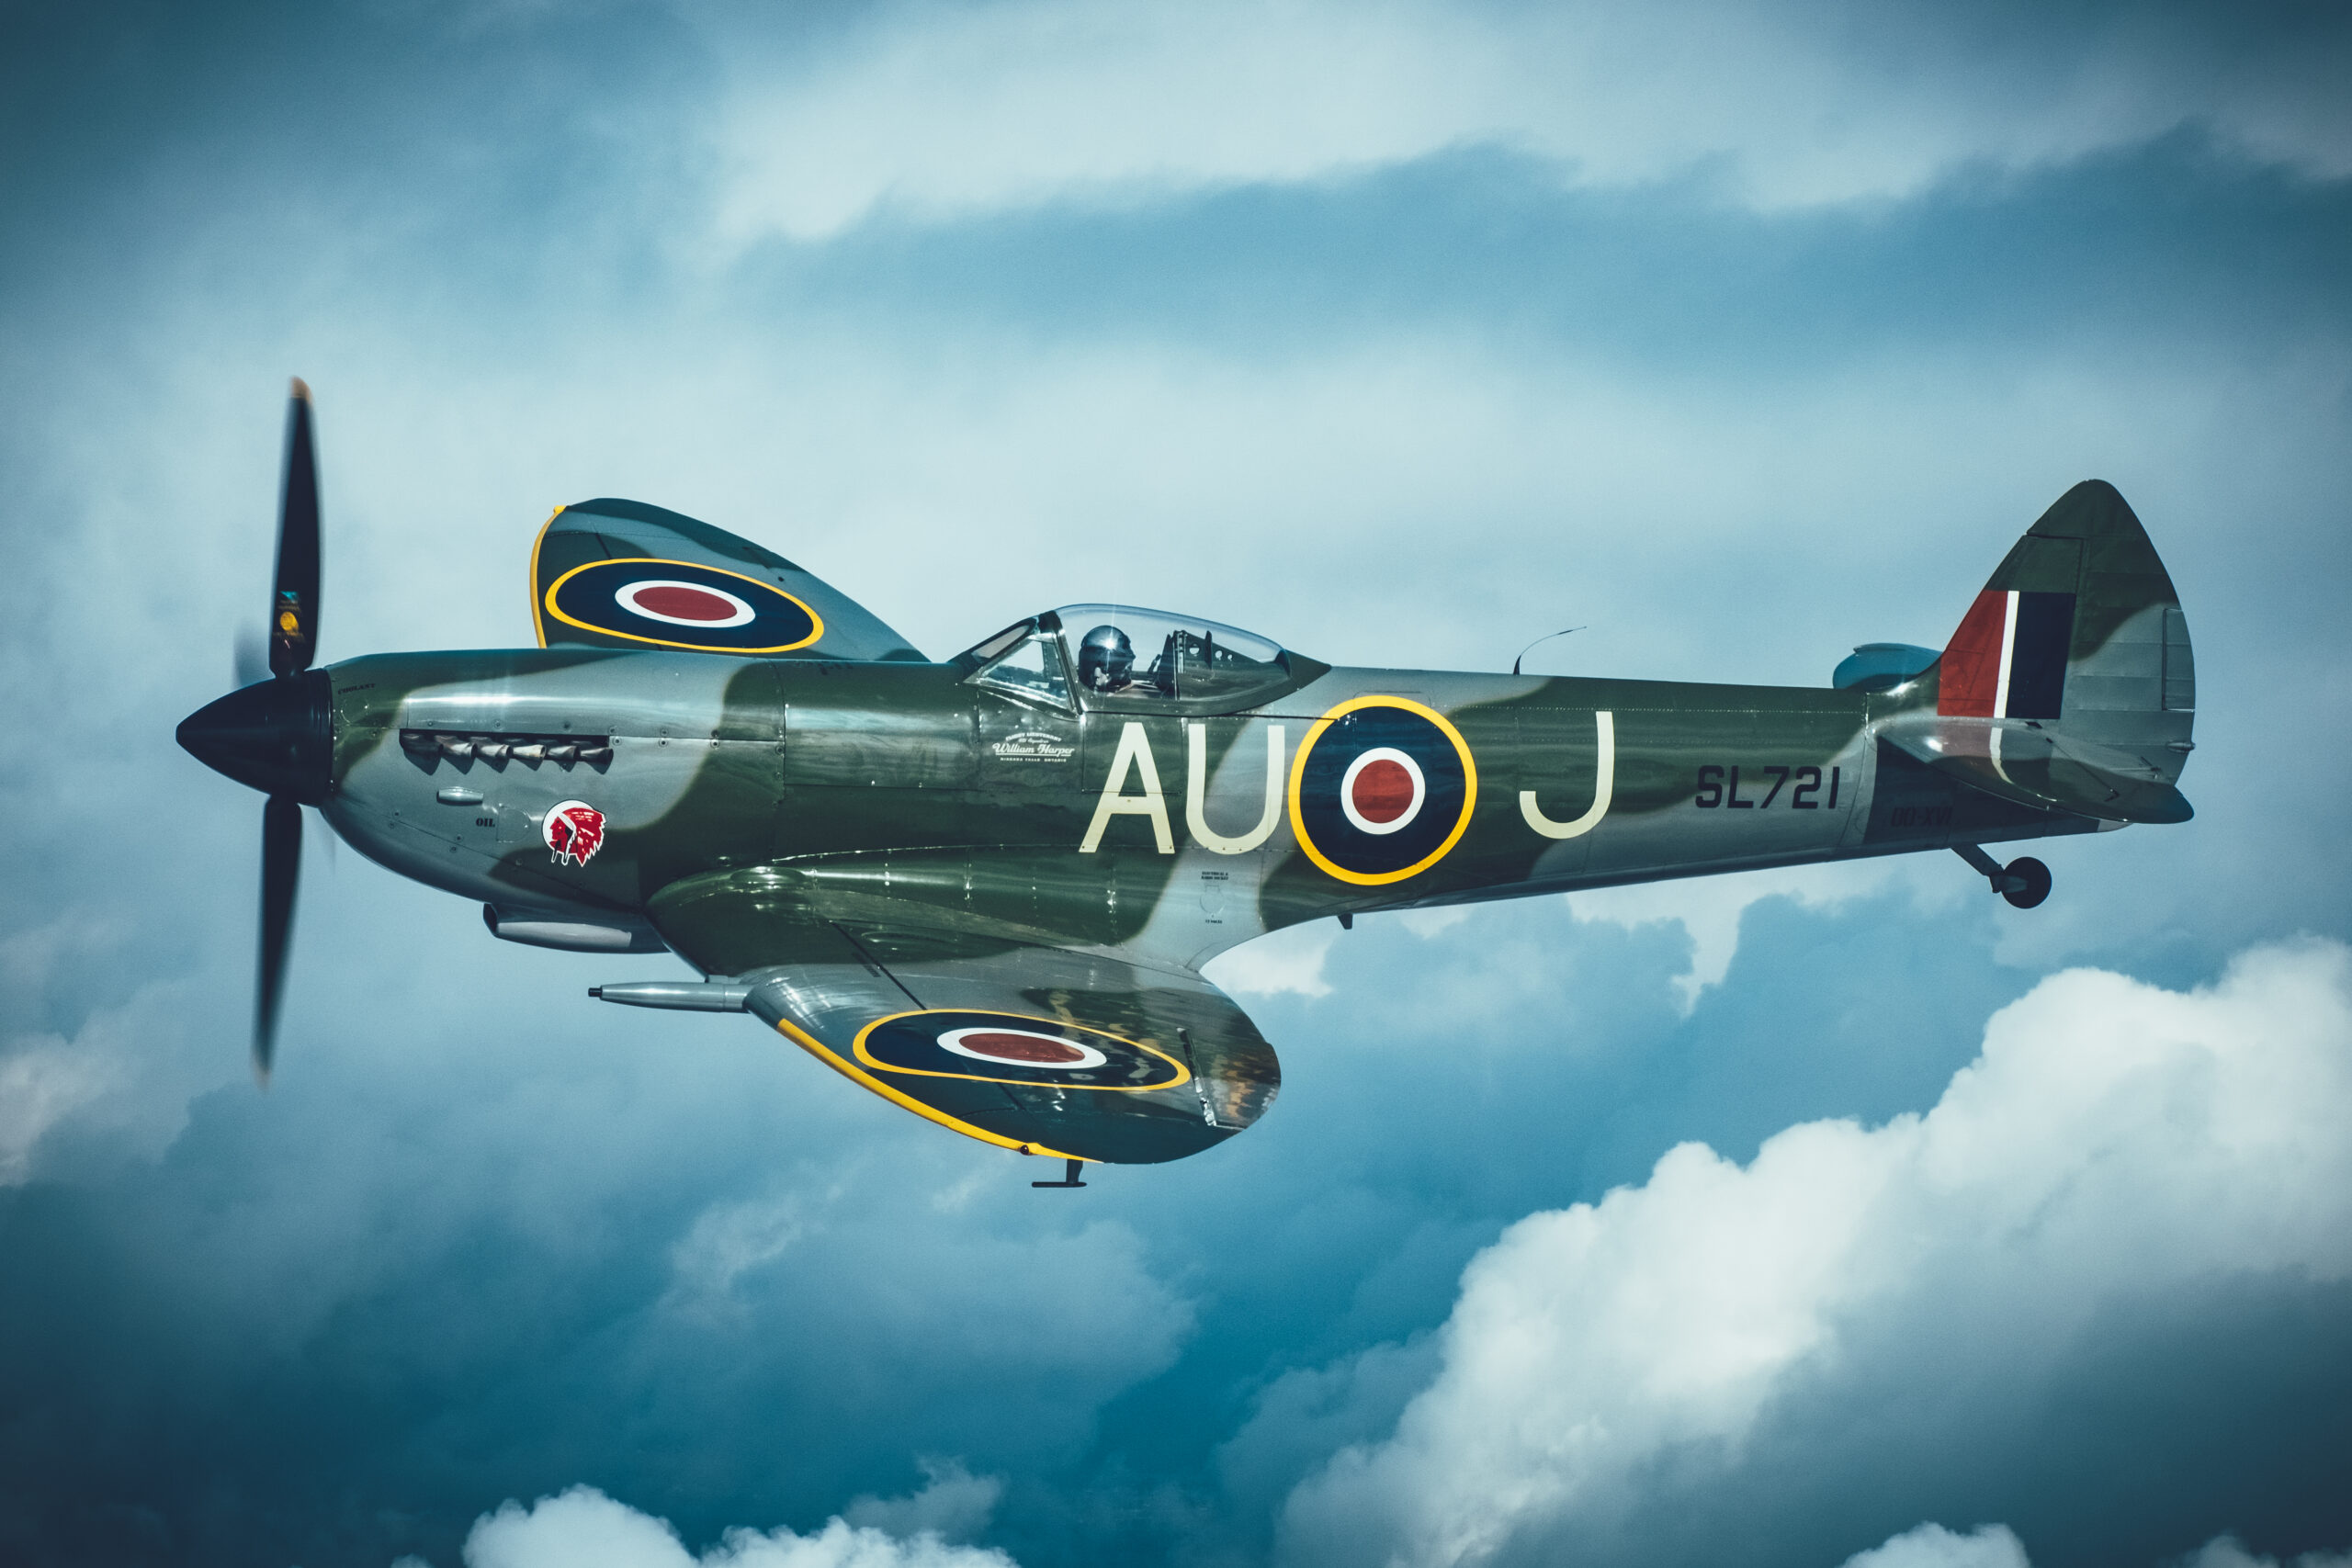
Our air-to-air coverage of the surviving Battle of Britain types is collected in the warbirds gallery.
Fourteen months later the same question was asked on the other side of the world, and answered very differently. Our account of the aircraft of the Pearl Harbor attack covers the order that parked the American fighters in rows, and the fourteen pilots who got airborne anyway.
Frequently asked questions
Which aircraft won the Battle of Britain?
No single type did. Hurricanes destroyed more German aircraft than every other British defence combined, simply because there were more of them, while Spitfires generally took on the escorting Bf 109s. Both depended on the radar-based Dowding system to be in the right place at the right time, and it is truer to say the system won the battle than any one aircraft.
How many aircraft were lost in the Battle of Britain?
Figures vary between sources, but between 10 July and 31 October 1940 the RAF lost around 1,500 aircraft across all commands, just over a thousand of them fighters, while the Luftwaffe lost around 1,900 aircraft. German aircrew deaths, at well over 2,500, were far higher than Fighter Command’s 544 because each lost bomber took a crew of four or five with it.
Was the Spitfire or the Hurricane more important?
The Hurricane was more important by the raw numbers in 1940: it equipped more squadrons and shot down more German aircraft. The Spitfire was the better performing fighter, the only British type that met the Bf 109 on equal terms, and it had far greater development potential, which is why it stayed in production to the end of the war while the Hurricane moved to other theatres and roles. The fairest verdict is that in the summer of 1940 Fighter Command needed both.
Why did the Luftwaffe lose?
Because it was asked to win a strategic war it was never designed for, against the world’s only integrated air defence system, with poor intelligence, shifting objectives and a fighter force operating at the limit of its range. Fighting over enemy territory meant every German loss was total, while many British pilots who were shot down flew again, and British fighter production comfortably outpaced German through the battle.
What does “the Few” mean and how many were there?
The name comes from Churchill’s speech of 20 August 1940. It refers to the 2,937 aircrew of Fighter Command, drawn from 15 nations including Britain, who flew at least one operational sortie during the battle and so earned the Battle of Britain clasp. 544 of them were killed during the battle.
Where can I see Battle of Britain aircraft today?
The Battle of Britain Memorial Flight flies Spitfires and Hurricanes at events across Britain each summer, and IWM Duxford’s air shows regularly feature large formations of both. Genuine 1940 veterans are preserved at the RAF Museum in London, IWM Duxford and elsewhere, and the Battle of Britain Bunker at Uxbridge preserves the 11 Group operations room where Churchill watched the fighting on 15 September 1940.
Picture researchers sourcing imagery of the battle’s most famous fighter will find our buyer’s guide to Spitfire photographs a practical companion, covering marks, captioning and licensing of modern air-to-air work.
